我们接着上文[js高手之路] html5 canvas系列教程 - 认识canvas以及基本使用方法继续.
一、直线的绘制
cxt.moveTo( x1, y1 ): 将画笔移动到x1, y1这个点
cxt.lineTo( x2, y2 ):将画笔从起点开始画直线,一直画到终点坐标( x2, y2 )
cxt.stroke();用画笔连线,moveTo,lineTo并不会产生实际的线条
x1,y1,x2,y2是点的坐标,canvas的坐标原点在canvas的左上角.
画一根直线:
1 <style> 2 body { 3 background:#000; 4 } 5 #canvas { 6 background:white; 7 } 8 </style> 9 <script> 10 window.onload = function(){ 11 var oCanvas = document.querySelector( "#canvas" ), 12 oGc = oCanvas.getContext( '2d' ); 13 oGc.moveTo( 50, 50 ); 14 oGc.lineTo( 250, 50 ); 15 oGc.stroke(); 16 } 17 </script> 18 </head> 19 <body> 20 <canvas></canvas> 21 </body>
如果把stroke注释了,是不会出现线条的,stoke的作用就是用来将点连起来
通过2个实例来区分,moveTo与lineTo的区别
1 <style> 2 body { 3 background:#000; 4 } 5 #canvas { 6 background:white; 7 } 8 </style> 9 <script> 10 window.onload = function(){ 11 var oCanvas = document.querySelector( "#canvas" ), 12 oGc = oCanvas.getContext( '2d' ); 13 oGc.moveTo( 50, 50 ); 14 oGc.lineTo( 250, 50 ); 15 oGc.moveTo( 50, 200 ); 16 oGc.lineTo( 250, 200 ); 17 oGc.stroke(); 18 19 oGc.moveTo( 300, 50 ); 20 oGc.lineTo( 500, 50 ); 21 oGc.lineTo( 300, 200 ); 22 oGc.lineTo( 500, 200 ); 23 oGc.stroke(); 24 } 25 </script> 26 </head> 27 <body> 28 <canvas></canvas> 29 </body>
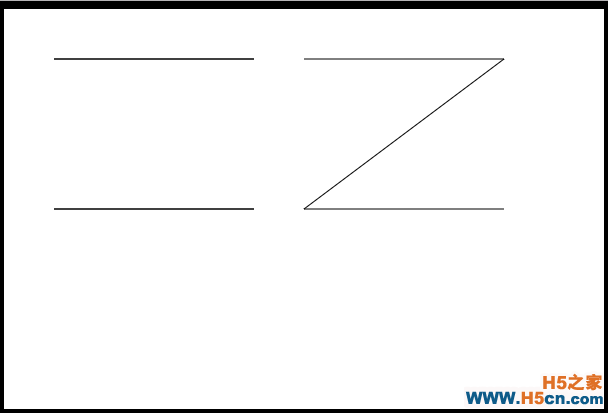
左右两边的线形图,代码就一点区别,左边图形是第二个点用了lineTo, 第三个点用了moveTo, 右边图形第二个点用了lineTo,第三个点还是lineTo,从图中你应该能感受到这两个方法的区别吧?
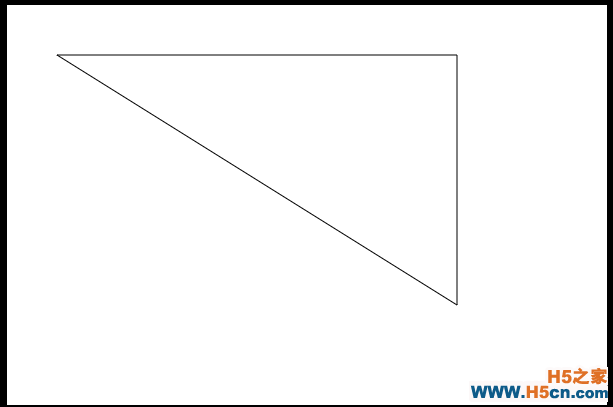
画三角形
1 <style> 2 body { 3 background:#000; 4 } 5 #canvas { 6 background:white; 7 } 8 </style> 9 <script> 10 window.onload = function(){ 11 var oCanvas = document.querySelector( "#canvas" ), 12 oGc = oCanvas.getContext( '2d' ); 13 14 oGc.moveTo( 50, 50 ); 15 oGc.lineTo( 450, 50 ); 16 oGc.lineTo( 450, 300 ); 17 oGc.lineTo( 50, 50 ); 18 oGc.stroke(); 19 } 20 </script> 21 </head> 22 <body> 23 <canvas></canvas> 24 </body>
把上面的代码,稍微修改下,就能画出一个矩形了
1 <style> 2 body { 3 background:#000; 4 } 5 #canvas { 6 background:white; 7 } 8 </style> 9 <script> 10 window.onload = function(){ 11 var oCanvas = document.querySelector( "#canvas" ), 12 oGc = oCanvas.getContext( '2d' ); 13 14 oGc.moveTo( 50, 50 ); 15 oGc.lineTo( 450, 50 ); 16 oGc.lineTo( 450, 300 ); 17 oGc.lineTo( 50, 300 ); 18 oGc.lineTo( 50, 50 ); 19 oGc.stroke(); 20 } 21 </script> 22 </head> 23 <body> 24 <canvas></canvas> 25 </body>

二,canvas提供了画矩形的API
通过线条我们也能拼接出一个矩形,但是代码太多,每个点都要把握,显得比较麻烦,canvas为我们提供了画矩形的API,有两种,一种是描边矩形,一种是填充矩形.
cxt.strokeStyle = 属性值
cxt.strokeRect( x, y, width, height )
strokeStyle后面的属性是为了修饰线条的,主要包括( 颜色值,渐变色,图案 ),颜色支持英文单词,十六进制,RGB, RGBA格式的颜色设置.
strokeRect: x, y为矩形的左上角坐标,width和height为矩形的宽度和高度
 相关文章
相关文章
![[js高手之路] html5 canvas系列教程 - 像素操作(反色,黑白,亮度,复古,蒙版,透明) - ghostw](/upload8/allimg/170929/1P134DA_lit.png)
 精彩导读
精彩导读 热门资讯
热门资讯 关注我们
关注我们
